Drywall Taping and Painting
Taping should start after Spring Break (back form Canada East).
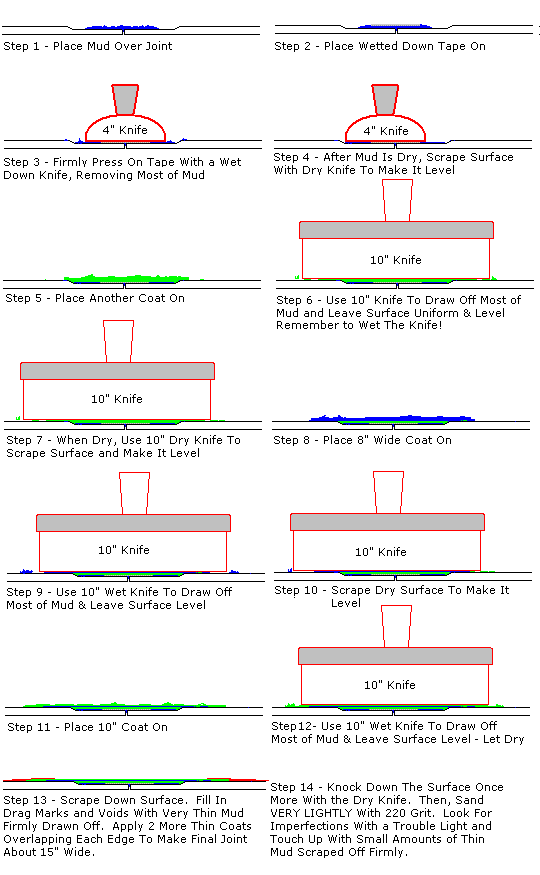
A picture is worth a thousand words mean a picture tells a story just as well as a large amount of descriptive text, so check out the taping joint view from Drywall Info
The list of tools for taping.
The list for tools for painting.

Videos and Links
Hometime Taping
Candiantire Taping
Tools for Taping:
You will need the following drywall tools to tape and finish drywall:
- A stainless steel mud pan. Don't get the plastic mud pan with rusting trouble!
- A 4" or 4 1/2 " steel knife. This should be steel (not plastic), somewhat flexible, and of a quality brand. It should be no wider than 4.5 inches so you can tightly fasten tape within the recessed area of a joint.
- A 10" steel knife. Get a good quality knife with proper stiffness since this is probably your most important knife for finishing the job properly. You also might want a 12" knife.
- A corner tool as shown here. Believe it or not, I found that the cheap plastic tool shown works better than its pricier steel counterpart!
- Paper tape as shown in the drywall tools picture. I don't like he mesh stuff - neither do nearly any professionals I have spoken too. I have found the knife glides over the paper tape easily (if the mud is thin as it should be) but tends to hang up on the adhesive mesh.
- A bucket of water for wetting paper tape and tools down.
- Mud. I bought the all-purpose mud from homedepot.
- T-Square for cutting as shown in the drywall tools picture. This is nice to use and doesn't cost that much. It is very helpful in making an accurate cut.
- Tape measure and Utility Knife - any type will do.
- Cordless Driver.
- Sandpaper - 100 grit & 220 grit. Also an 8 inch by 3.5 inch piece of wood for a sanding block. For hard to reach places, a sanding pole as shown in the tool picture is helpful. If you do this all right, you won't need much sandpaper!
- For ceilings, a panel lift is helpful, although a T-bar made of lumber will work
Tools for Painting

