Arduino Intro Labs for Tangible Computing
5. Lab 3 - Making and Controlling Sound


5.1 Purpose

The outcomes of this lab are:
  1. Understand some of the basics of sound production, and the notions of frequency and period.
  2. Know that we can produce square waves simply, but more realistic sounds require additional circuits.
  3. Get more practice at using analog input to control our circuits.
  4. Introduce the while() loop.
  5. Use the map function.
  6. Begin to use previous solutions for different problems in a new situation. Reuse is an important activity in computing.


5.2 Introduction to Sound

A sound wave consists of varying pressure over time. Sound is typically transmitted in gas and liquids as longitudinal waves or compression waves. Sound is characterized by the frequency of the wave, in terms of cycles per second. The unit is the Hertz (Hz), with one cycle per second being 1 Hz. The higher the frequency the higher the perceived pitch of the sound. You can also express a sound in terms of its period (physics), which is the time to make one complete cycle of the wave. So period is measure in 1/Hz, or in seconds per cycle.

A loudspeaker (or just speaker) is a device that converts an electrical signal into a pressure wave. This is usually done by moving a diaphram (or speaker cone) back and forth a distance that is proportional to the applied voltage. The diaphram can be moved via an electromagnet, or via a piezoelectric crystal.

The Arduino does not have built in analog outputs. So if you connect a digital output to a speaker, you do not get very smooth excursions. Instead you get a (roughly) square wave. But we still perceive these square waves as tones. If you turn the digital output on and off 1000 times per second, you will generate a 1000 Hz tone.

The following code will generate such a 1000 Hz tone:
     while ( 1 ) {
         digitalWrite(speakerPin, HIGH);
         delayMicroseconds(500);
         digitalWrite(speakerPin, LOW);
         delayMicroseconds(500);
     }
In this snippet of code we introduced the while() loop. The while loop is very similar to how the void loop() works in every arduino program as in it will loop over the code in it's block over and over again. However, unlike the void loop(), the while loop needs a condition to be true in order to keep looping. This is similar to an if statement.

In this case we used while(1). This results in an infinite loop because '1' is always treated as true and since the 1 will never change, the contents of the while loop will repeat itself over and over again. This means it will never leave the loop, meaning it won't execute any other code besides its contents.
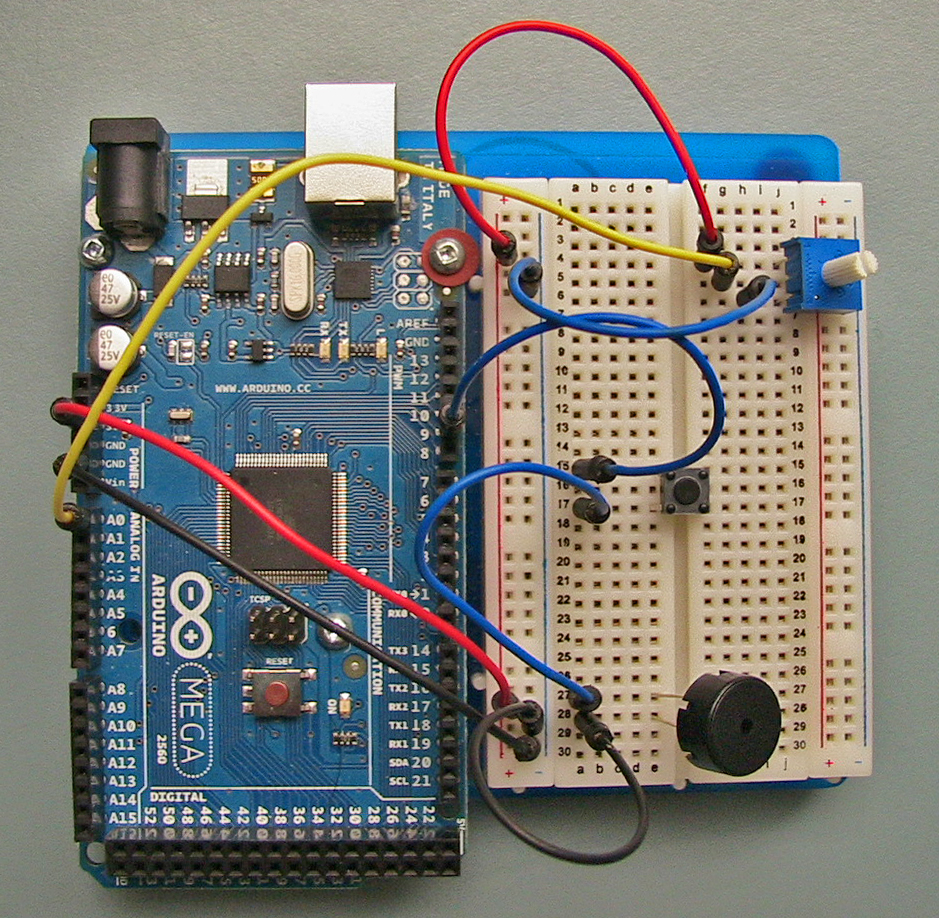
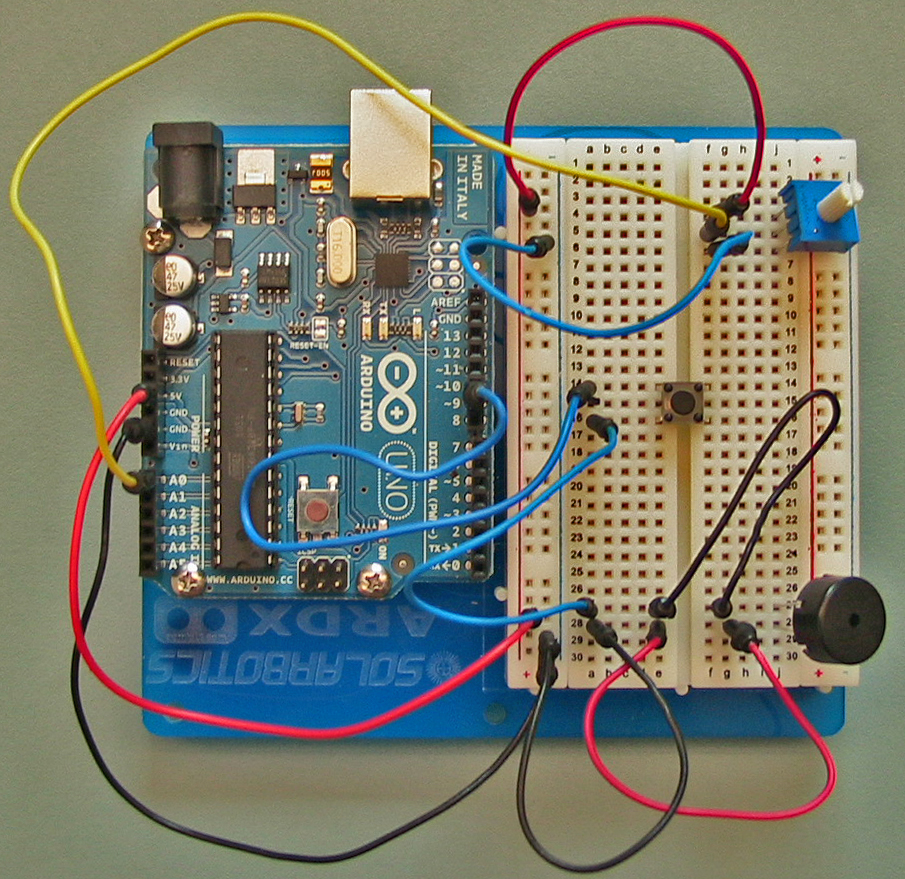
Note how we need to know the period of the tone. In this case it is 1 mS (milli second) or 1000 uS (micro seconds) so that we can express the on/off process using microsecond delays.

The higest frequency that we can hear is about 20,000 Hz. This means that the period is 1/20,000 or 50 uS. More typically it is about 10,000 Hz, which gives a 100 uS period.

The lowest frequency that we can hear (as opposed to feel) is about 30 Hz, which is a period of 1/30 or about 33000 uS. 100 Hz has a period 1/100 or 10000 uS.

5.3 The Basic Circuit

Here is a simple circuit that uses the potentionmeter to set the period of the tone, which is played for a 0.5 second duration. The push button must be pressed in order for the piezo speaker to produce any sound - this is so that you do not drive everyone in the room mad.
Arduino Mega Arduino Uno
Click the image for full size!


The wiring for the Mega and the Uno look different but they will both work, so don't worry about which way you do the wiring. The Uno demonstrates that two halves of the breadboard are not connected so you need those two extra wires to carry the current over to the piezo.


code/Lab_Sound/Sound/Sound.ino

    int speakerPin = 9;
    int controlPin = 0;
     
    void setup() {
        pinMode(speakerPin, OUTPUT);
        }
     
    /* 
     
    play a tone with period given in microseconds for a duration 
    given in milliseconds
     
    */
    void playTone(int period, int duration) {
        // elapsed time in microseconds, the long is needed to get
        // a big enough range.
     
        long elapsedTime = 0;
     
        // note we are making a slight error here if period is not even
        int  halfPeriod = period / 2;
     
        while (elapsedTime < duration * 1000L) {
            // generate a square wave of the given period.  Half the 
            // period is on, the other half is off.
            digitalWrite(speakerPin, HIGH);
            delayMicroseconds(halfPeriod);
     
            digitalWrite(speakerPin, LOW);
            delayMicroseconds(halfPeriod);
     
            // count the time we just consumed for one cycle of the tone
            elapsedTime = elapsedTime + period;
            }
     
        }
     
    void loop() {
        int period;
     
        period = analogRead(controlPin);
        playTone(period, 500);
        }


5.4 Your tasks:


5. Lab 3 - Making and Controlling Sound
Arduino Intro Labs for Tangible Computing / Version 1.00 2012-09-24