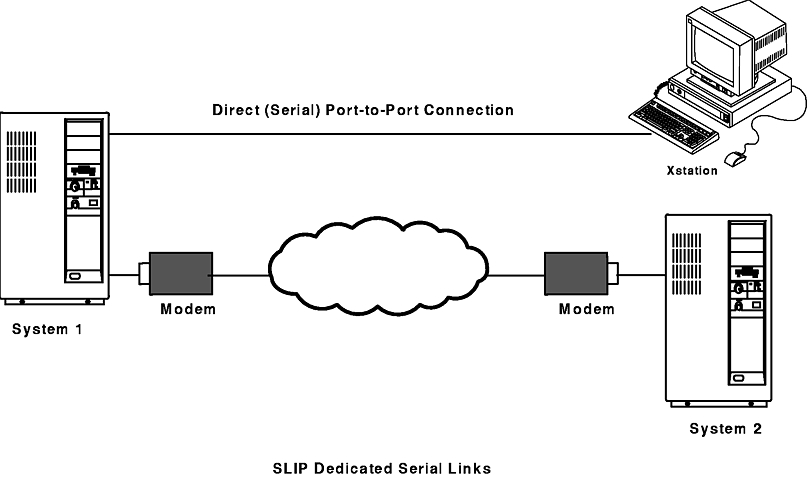
Serial Line Internet Protocol (SLIP) is the protocol which TCP/IP uses when operating through a serial connection as shown in the following figure. It is commonly used on dedicated serial links and dial-up connections that operate at speeds between 1200bps and 19.2Kbps or higher.
Note: To use baud rates higher than 38400, specify a baud rate of 50 in the /etc/uucp/Devices file for the desired tty, then change the SMIT configuration for that tty to reflect the actual baud rate desired.For example. to run the cu command on tty0 with a baud rate of 115200, use the following procedure:
- Ensure the hardware supports the baud rate.
- Edit /etc/uucp/Devices to include the following line:
Direct tty0 - 50 direct- Enter the smit chtty fast path.
- Select tty0.
- Change the baud rate to 115200.
- Exit SMIT.
See the following for further discussions of SLIP:
There are two recommended steps to follow during SLIP configuration. Using this two-step approach separates the hardware and machine-dependent configuration requirements from the SLIP software and command syntax problems.
Use ATE or the cu utility to accomplish a successful login at the remote system. This proves the usability and correctness of the physical link.
It is important to verify the operability of any modems involved in a SLIP link as they are the most frequent cause of problems during the setup phase. For this reason, topics on modem considerations and modem programming are presented before any SLIP configuration procedures in this chapter.
After establishing an error-free login to the remote system using ATE or the cu command, the user can begin the SLIP configuration.
When configuring modems for SLIP, it is important that the following changes be made on both ends of the communication link. Both the local and remote modems must be configured exactly the same.
Referencing the local modem, if DTR is assumed or ignored, the modem can never perform a hang-up. It can only close the line or hangup when it recognizes the loss of carrier from the other end. This means that disconnects can occur only when instigated by the other end. The AT commands &D2 or &D3 are proper settings for most Hayes-compatible modems.
DCD must follow or track the real condition. This means that carrier will exist after a bona fide connection to the other end (modem) across the switched telephone line. This also applies to a dedicated line. &C1 is the suggested setting for most Hayes-compatible modems.
CTS must track or follow request To send (RTS). If CTS is forced true, the port open will fail whenever a getty is put upon the port or when RTS flow control protocol is added to the port.
If, the modems repeatedly fail to make a connection during slattach dial-in attempts, the user should check the modem configurations and turn off the ARQ codes if they are currently on. In most Hayes-compatible modems, this is the &A0 setting.
Disabling ARQ result codes does not affect error-controlled connections nor does it keep the modem from returning standard CONNECT messages (if result codes are enabled) as needed for the slattach dial string.
Either BOTH modems or NEITHER modem can use it. Normally, both modems must agree on its usage during the connect session. If ECL is chosen, the physical telephone line must be good enough to allow a recovery from a data error before the TCP/IP timers expire while awaiting an acknowledge packet for the last data sent across the SLIP link.
It is acceptable to use data compression across the link as long as it is totally handled by the modems. SLIP does not perform any type of compression. If data compression is invoked, it is much better to have two modems of the exact same type; this ensures that each will perform the compression in the same manner and same time frame.
Use the following procedure to manually program modems attached to the system unit.
Direct tty# - Any direct
Note: Any line in the Devices file which begins with a # sign in the leftmost column is a comment.
cu -ml tty#
ATE1 <enter>
ATQ0 <enter>
ATE1 turns the echo mode on which displays any typed characters to the screen. ATQ0 enables the displaying of result codes.
AT&F    <enter>
AT&D2   <enter>
ATS0=1  <enter>
ATS9=12 <enter>
AT&C1   <enter>
AT&W    <enter>
~.      <enter>
Where &F is used to reset the modem to factory defaults, &D2 sets DTR, S0 and S9 set register values, &C1 set carrier, and &W writes the settings to the modem. The tilde-period ends the connection.
Users can customize their modems manually or use the cu utility with its associated files to create an automated modem configuration script.
The following example shows how to automatically configure a Telebit T3000 modem attached to tty0.
telebit Nvr TELEPROG 19200
TELEPROG tty0 - 19200 TelebitProgram
Note: The following four lines should be made into one long line:
TelebitProgram =,-, "" \dAT&F\r\c OK ats0=1s2=255s7=60s11=50s41=2s45=255s51=252s63=1s58=2s64=1\r\c OK ATs69=2s105=0s111=30s255=0M0&C1Q2&D3&Q0&R3&S1&T5\r\c OK ATE0X12&W\r\c OK
cu -d telebitThe command will fail because you are not connecting to a system. Watch the debug output of the command to see that ATE0X12&W is sent to the modem and that an OK is received. If so, then the modem has been successfully programmed.
Problems may arise because of incorrect values placed in the Dialers file or because of the modem's existing configuration. If this occurs, try programming the modem manually and enter the dialers strings (in step 8) one by one.
The following procedure lists the steps necessary to configure a SLIP line between two system units communicating over 9600 baud modems. For clarity, these instructions use the names systemA and systemB for the two hosts.
Note: The remaining instructions assume that the tty number on both systems is tty1.
cu -m1 tty1
If systemA is also NOT at AIX Version 4.1 or greater, issue the same command on it by entering:
stty add rts < /dev/tty1
Direct tty1 - 9600 directThis entry must precede any other entry for tty1 in the Devices file and should always begin in the leftmost column.
[130.130.130.2]
[130.130.130.1]DO NOT make entries in the BAUD RATE or DIAL STRING fields at this time. These entries can be added later after the correct operation of SLIP is verified through command line options.
INTERNET ADDRESS     [130.130.130.2]
DESTINATION Address  [130.130.130.1]
130.130.130.1    systemA
130.130.130.2    systemB
The name assigned should be unique. In other words, if the Token-Ring interface on systemA is already assigned the name systemA, assign the SLIP interface a name such as systemA_slip.
slattach tty1 9600
slattach tty1 9600 ' "" AT OK ATDT555-1234 CONNECT "" 'The command can be read as: Use tty1 at 9600 baud. Send AT to the modem. The modem should respond with OK. Dial the phone number 555-1234. The modem should respond with CONNECT.
Users may add the number nine to the end of the slattach dial string in order to obtain debug information during the dial attempt. For example:
slattach tty1 9600 ' "" AT OK ATDT555-12349 CONNECT "" ' 9This debug output is similar to information displayed when using the cu -d command on a tty device.
Note: The debug option is not a supported feature of slattach and is supplied on an as-is basis. Non-supported features may be removed at any time without notice to the users.
Serial Line Internet Protocol (SLIP) is a driver that provides point-to-point connection from an Xstation 130 to a host providing boot service and X protocols. This allows the Xstation 130 to use the capabilities of remote hosts not physically connected by an Ethernet or token-ring network.
The SLIP protocol recognizes Internet Protocol (IP) packets on a serial line, runs Xclients on the Xstation from a serial-line connected host, and runs some Internet Control Message Protocols (ICMPs), such as those used by the ping command.
Two methods of SLIP configuration from an Xstation to a host system are shown in the following figure. Xstations may be directly attached to the host system through a null modem cable or they may be attached over modems.
Connect one end of the EIA-232 serial cable to the selected serial port on the host, and the other end to the selected serial port (s0, s1, s2, or s3) on the Xstation 130 or a host modem. If a host modem is used, connect the selected Xstation serial port to its modem.
To temporarily deactivate a SLIP connection, do the following on both the local and remote systems:
ifconfig sl# down
ps -ef | grep slatThe output may be similar to the following:
root 1269 1 0 Jun 25 ... slattach
kill 1269where 1269 is the slattach process ID. Do NOT remove the slattach process using the -9 flag of the kill command.
Use the following instructions to activate a SLIP connection that is temporarily disabled using the above instructions. Run these commands on both the local and remote systems.
ifconfig sl# up
Use the following instructions to completely remove a SLIP interface. Once these instructions are executed both the sl# interface and its associated slattach process are removed. Any entries made to the /etc/hosts file will remain and must be removed manually.
Note: Any entries made to the /etc/hosts file will remain and must be removed manually.
The following describes the commands needed to debug SLIP problems and supplies you with examples.
The netstat command works in conjunction with the ifconfig command to provide a status condition of the TCP/IP network interface. The command netstat -in for example uses the -i flag to present information on the network interfaces while the -n flag prints the IP addresses instead of the host names. Use this command to verify SLIP interfaces, addresses, and hostnames. The following section describes netstat -in output.
Program the modem using the settings shown in the previous section, "Modem Considerations." The following example demonstrates how to program and save basic settings for a Hayes-compatible modem. Enter:
Name  Mtu   Network    Address             lpkts     Ierrs Opkts Oerrs  Col
lo0   1536  <Link>                         2462       0    2462   0     0
lo0   1536  127        localhost.austi     2462       0    2462   0     0
tr0   1492  <Link>                         1914560    0   21000   0     0
tr0   1492  129.35.16  glad.austin.ibm     1914560    0   21000   0     0
sl0   552   1.1.1.0    1.1.1.1             48035      0   54963   0     0
sl1*  552   140.252.1  140.252.1.5         48035      0   54963   0     0
Notice the * next to the sl1 interface. This shows that the network interface is down or unavailable for use. The user can correct this by issuing the ifconfig sl1 up command if it is a valid SLIP interface.
netstat provides statistics concerning input and output packet counts as well as input and output errors that are helpful when troubleshooting SLIP connections.
The user enters a ping to a remote host across a SLIP link and the ping command appears to hang. They quickly run a netstat -in command from another command shell and notice that the Opkts are increasing but that there are no Ipkts from the remote host. This indicates that the remote system is not returning (or not receiving) the information. They must run the same netstat command on the remote system to verify the receipt of the ping packets or rise in the error count.
The translation of hostnames versus Internet numbers is relative to name resolution and thus critical to proper operation of a SLIP line. To debug hostname, aliases, and routing problems, use the netstat -rn command. The basename of the host or hostname is the only name that should return from the /etc/hosts file. If the machine is being serviced by a nameserver (ie. /etc/resolv.conf exists), then the name-server will return the fully qualified-domain name in this command.
The ifconfig command is the network interface configuration tool provided with AIX. It allows the network interface STRUCTURE to be dynamically created or deleted from the kernel memory in AIX. This command accepts data from the command line, then builds a memory structure that conforms to the parameters. For debugging purposes, the ifconfig command is used to examine the status of a communications interface.
To examine the current status of the sl1 interface:
Any tty port that is used for SLIP connections must be in a disabled or unavailable state. To verify that the port for tty1 is disabled, obtain root user authority and enter one of the following commands:
This command displays the permanent state of the tty port as recorded in the system's Object Database Manager (ODM). If the output is anything other than login disable, use SMIT to change the enable LOGIN field to disable.
This command, when used without parameters, displays all tty ports that are in a disabled state. In this example, pdisable is piped to the grep command to eliminate unnecessary output. If tty1 is not displayed after running this command, the port is not disabled.
The ps command displays information about active processes to standard output. Use this command to verify the existence (or nonexistence) of slattach processes that are used to assign a tty line to network interfaces.
If netstat -in shows that the interface is down, the user should run the ps -ef | grep slat command to see if an slattach process is currently running on the associated tty port. Note that for a directly connected SLIP interface, broken connections are retried automatically without manual intervention. For a SLIP interface connected by modem, broken connections must be manually redialed. If a user supplies a dial string in the slattach command line, the user must reenter the command and dial string to restore a broken connection.
The ping command and modem lights are used to debug SLIP communication problems. A ping is an echo request packet, sent out of the machine, and an echo response packet is returned. This sequence of events is useful if the administrator can see the modem lights.
The local system constructs the echo request packet and sends it to the remote system. The Send Data (SD) light on the local modem illuminates. This means that the local TCP/IP, slattach, and tty were able to group information and send it out of the modem to the remote system.
The remote modem receives the packet and the receive data light flashes but its SD light does not. This means that the remote system was not able to send (or return) the local system's ping request. As a result, the user on the local system may see the ping command hang, requiring a Ctrl c to exit the condition.
The most common cause of this problem is the use of XON/XOFF flow control in one or both modems, however, the user should not overlook the possibility of routing or address conflicts on the systems.
Message: 0821-296 Cannot set line discipline for /dev/tty# to slip.ioctl(TXSETLD). A system call received a parameter that is not valid.
Possible Causes: This type of error normally occurs when starting the slattach process and is attributable to incorrect configuration of SLIP. The problem is most likely caused by a mismatch between the tty device number and the sl interface number. This also explains why the system reported that ifconfig had not been run before slattach.
This problem may also occur when slattach processes are dropped or killed incorrectly or when the user attempts to move a SLIP connection to another tty port and forgets to reconfigure the sl# interface to match the tty. Check for running slattach processes that may still be running (for example, ps -ef | grep slat).
Action: The tty device for SLIP is /dev/tty24 and user has created an sl0 interface. This is incorrect. The user should create an sl24 interface which matches the tty number (tty24 and sl24). If the problem continues, the user should bring down the sl interface (see "Bringing Down an SLIP Interface") and reconfigure the connection using the following commands:
lsdev  -Cc if  -s SL
lsattr -El sl0
Possible Cause: These errors occur most often when a user attempts to ping a host over the SLIP link and the link has been improperly established. The most likely problem is that one or both tty ports associated with the sl# interface are in an enabled state. It is also possible that there is an address or route conflict between the host systems.
Problem: When the remote site dials in to the local host, the modem on the local host connects but does not complete the login process.
Possible Causes: If the two modems connect and begin to handshake or exchange connection information but then disconnect, the problem may be due to modem result codes. This problem can also be caused by an improper slattach dial string. If the two modems ring but never begin the handshake process, the problem may be that the modem is not set for auto-answer.
Problem: The user is unable to ping across a modem SLIP connection. The ping command may hang or return error messages.
Additional help with SLIP setup is available through ConsultLine which is a fee based offering of the AIX Support Family.
Use the SLIP questionnaire located on the next page to record information on the existing SLIP configuration before calling the help line. In this way, the user can more efficiently relay his information to help line personnel and speed up the troubleshooting process.