The customizing tool provides useful browsers that assist you in changing the values of resources. The most useful of these browsers can also be started as standalone applications. This can be useful, for instance, if you want to locate a particular color but do not want to actually customize an application.
The following can be started as standalone browsers:
The remaining tools are not available standalone:
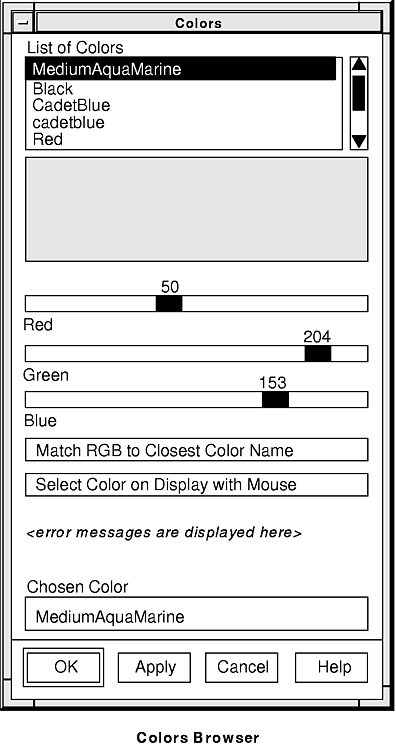
The Colors browser assists you in choosing valid color values.
See the figure for an illustration of the Colors browser.
The list of colors in the Colors browser allows color names from the /usr/lib/X11/rgb.txt file to be selected. If your X server is not using the /usr/lib/X11/rgb.txt file (for example, Xstations running the Xstation Manager version 1.3), the Custom*rgbtxtPath resource should be set to the path of the alternate rgb.txt file. Otherwise, the following error will occur if a color is selected that is not contained in the rgb.txt file in use by your X server:
The color name does not exist in /usr/lib/X11/rgb.txt
When you select a valid color from the list, the window directly below the list displays the chosen color, the RGB sliders are set to the RGB value of the chosen color, and the Chosen Color text field is set to the color name.
A color may also be set using the Red, Green, and Blue sliders, giving you finer control over color selection. When you move a slider bar, the window above the sliders reflects the color defined by the RGB slider values. The Chosen Color field is set to the RGB representation of the color, which begins with a # sign and is followed by the hexadecimal representation of the red, green, and blue values, respectively (for example, #8456c8).
After you position the RGB sliders to a desired color, you can press the Match RGB to Closest Color Name button. It finds the closest color name to the RGB value in the list of colors, highlights that color name in the list, and repositions the RGB sliders accordingly. The Chosen Color field is set to the value of this color.
When the Select Color on Display with Mouse button is pressed, the mouse cursor changes shape, prompting you to select any color that is displayed by clicking the left mouse button. The Colors browser then finds the RGB values for that color, repositions the slider bars, and also highlights the color name in the list of colors if it matches a valid color name.
You can press the OK button when you are satisfied and want to save the color choice, or you can press the Cancel button if you want to exit the Colors browser without saving. The help facility for the Colors browser is called by pressing the Help button. To exit the help facility, press the Cancel button.
The Fonts browser assists you in choosing font values. The fonts in the list describe fonts in your system X server.
See the figure titled "Fonts Browser" for an illustration.
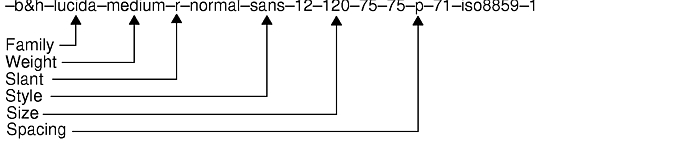
There are six filters to narrow down font choices in the list. A specific family, weight, slant, style, spacing, or size can be chosen. All of these filters offer the option of Any, which lists all items of that category. See the figure illustrating the six filters.
Some of the values that appear in these filters may not apply to the fonts that are available on your X server. If you select a value from one of these filter lists that does not apply to any of the fonts that are available, the browser displays an empty list of fonts and the following message:
0 fonts match the specified filters.
This situation may occur if your X server font path does not include paths to additional fonts installed on the system. You can add font paths using the following command:
xset +fp
When you choose values for the filters, the list is refiltered to show only the fonts conforming to the chosen values.
When you select a font from the list of fonts, it is displayed in the Chosen Font field. Your selection is also reflected in the Sample field.
The size filter lets you specify the size of a font in points, either by selecting a size from the list or by typing a size into the text field beneath the list and pressing the Enter key. The list contains all the sizes of bitmap fonts that have been installed on your X server. In addition, your X server may have scalable fonts. These are fonts that are specially designed so that they can be drawn at any size you specify. To see a list of the scalable fonts available, type a size into the text field located below the Size filter that does not appear in the list and press the Enter key. A list of the scalable fonts scaled to the size you specified is displayed. When you select a size from the list of sizes or when you enter a size that also appears in the list, scaled fonts are included with the bitmap fonts in the list of fonts.
The toggle button immediately above the Chosen Font field lets you specify that the character set encoding to be used is determined from the locale in effect when the application that you are customizing is run. This field is not a filter. Instead, it controls whether the chosen font is written in a language-independent way with the *: notation replacing the character set. The *: notation is of most concern if your language requires multiple fonts. Not all applications support the *: notation, but all AIXwindows applications do support it. Refer to the Fonts Browser illustration for an example.
Press the OK button to write the value to the resource text field. Press the Cancel button to exit the browser without saving the value. Help for the Fonts Browser is provided. To exit the help facility, press the OK button.
You can use the Fonts browser to help you choose fonts that meet the requirements of the ISO 9241, part 3, standard. This standard sets ergonomic guidelines for fonts so that text is easier to read.
For this feature of the Fonts browser to function correctly, you must first inform the X server of the physical dimensions of your display screen. You only need to do this set-up procedure one time. To set the physical size of your display, first use a ruler to measure the width and height of the image area of your display in millimeters (mm). Measure only the area of the screen that is actually used. Then log on as a user with superuser privileges and enter the following command:
Select the name of the display you are using from the list that is presented. Enter the width and height into the fields provided and press the Enter key to make the changes. Finally, exit all applications running on your system, and then shut down and reboot the system using the following command:
When the system comes back up, the display is configured with the new size you set.
The fonts that have been specially designed to meet the ISO 9241.3 standard have iso9241 as the ADD_STYLE_NAME field of their XLFD names. You can list these fonts using the Fonts browser of the customizing tool by selecting the ISO 9241.3 style filter.
However, a font that meets the standard on one display may not be satisfactory on another display. For example, a font that is fine on one display may appear too small to read on a display with higher resolution.
After selecting a font from the list, look for a message beneath the sample. If the characters in the font are large enough when shown on the display screen you are currently using, the following message is displayed:
When used on this display screen, this font meets
the requirements of the ISO 9241.3 standard.
Note: The ISO 9241.3 standard has guidelines for hardware display technology as well as the design of fonts. The Customizing Tool is not able to detect whether the display being used has the necessary characteristics. See the documentation that came with your display to see if it meets the requirements of ISO 9241.3 standard.
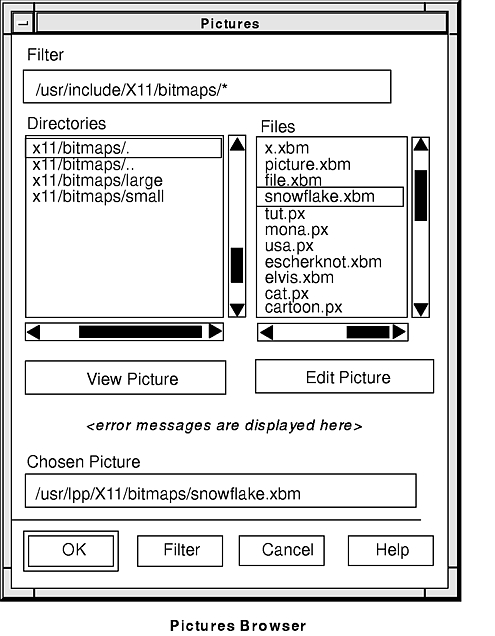
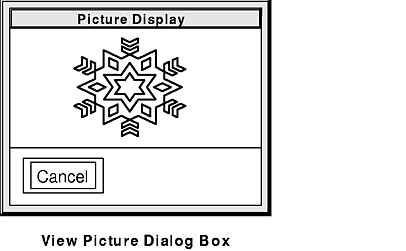
The Pictures browser allows bitmaps and pixmaps to be chosen and viewed. See the figure titled "Pictures Browser" for an illustration. A file selection box, in which the filter is set to the /usr/lpp/X11/bitmaps/* filter, is provided to browse the pictures. Use the Pictures browser to change directories, to view files, and to select a file that contains a valid bitmap or pixmap. You can view the bitmap or pixmap by pressing the View Picture button on the Pictures browser window. See the figure illustrating the View Picture pop-up dialog box.
You can edit the bitmap or pixmap by pressing the Edit Picture button on the Pictures browser window. The editor is a separate application that exists on your system. It is called on your behalf. The Custom*pictureEditor*editor resource determines which editor commands to choose from. This resource accepts a list of commands separated by \n's (backslash `n's). The first command that identifies an existing program that the user has permission to execute is used. The file name in the Chosen Picture text field is passed as a parameter to the editor when it is invoked. The default setting for this resource is:
Custom*pictureEditor*editor:   /usr/dt/bin/dticon -f \n\
                                                   /usr/lib/X11/bitmap
Note: The default editor, /usr/dt/bin/dticon only exists if the Common Desktop Environment (CDE) is installed. It edits both bitmaps (monochrome images) and pixmaps (color images). The dticon command accepts bitmaps stored in either the X Pixmap Version 2 Enhanced (XPM2) format which was used by the X Desktop (xdt) application shipped in AIXwindows Version 1.2.5, or X Pixmap Version 3 (XPM3) - a new XPG3 compliant format used by CDE. However, it requires pixmap images be stored in the XPM3 format. CDE has documented tools that can be used to convert pixmaps from the XPM2 to the XPM3 format.
The /usr/bin/X11/bitmap command is an unsupported sample program that accepts bitmaps in either the XPM2 or XPM3 formats. It does not support pixmap editing. Be sure that the Bitmap app-defaults file has been installed in the /usr/lib/X11/app-defaults directory before invoking the bitmap command. If not, issue the following commands in the /usr/lpp/X11/Xamples/clients/bitmap directory:
xmkmf;
make install
Error messages are displayed above the Chosen Picture text field. An informational message is usually displayed stating the type of picture (pixmap or bitmap) and its size.
Press the OK button to write the value to the resource text field. Press the Filter button to switch the file system. Press the Cancel button if you want to exit with no changes. Help is available for this editor.
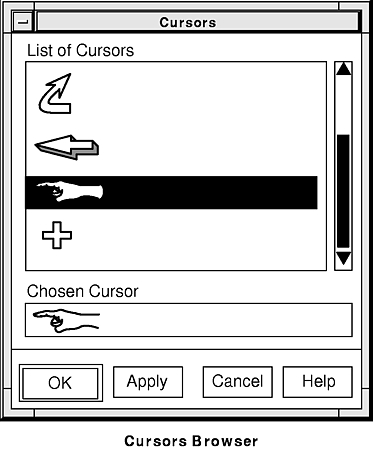
The Cursors browser brings up a graphical list of cursors from which to choose. See the figure for an illustration. Applications usually use the cursor font for the picture on the mouse cursor. The cursor font names and indexes can be found in the /usr/include/X11/cursorfont.h file. A cursor can be selected from the list with the mouse button and is displayed in the Chosen Cursor field. You can press the OK button to write the value to the resource text field. The Cancel button to exit the editor without saving the value. Help for the cursor editor is provided.
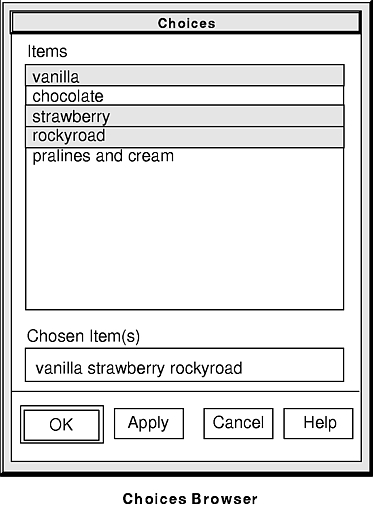
You can select several items from the list in the Choices Browser. The items are then joined and displayed in the Chosen Items field as they appear when saved to the resource database. For example, if the items in the list are translated into French, the value at the bottom still shows in an English specification. Press the OK button to write the value to the resource text field. Press the Cancel button to exit the browser without saving the value. Help for the Choices browser is available. See the figure titled "Choices Browser."
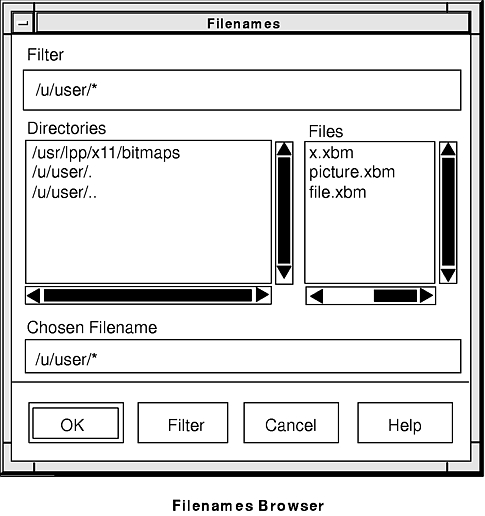
The Filenames browser is used to change directories, to view files, and to select files. See the figure for an illustration of the Filenames browser.
The Filter text field lets you display and edit a directory filter that is used to select the files to be displayed. The directory filter must be a string specifying the base directory to be examined and a search pattern.
The Directories field displays the subdirectories of the base directory, the base directory itself, and its parent directory. To change directories, double click on an item in this list.
The Files field displays all files in the base directory that match the search pattern.
The Chosen Filename field contains the current file name selection. It is updated whenever you select a file name from the Files field list.
If you press the Filter button, the Files field list is filtered to display all files and subdirectories in the base directory that match the search pattern.
Press the OK button to write the value to the resource text field. Press the Cancel button to exit the editor without saving the value. Help for the file browser is provided.
Using the AIXwindows Customizing Tool Overview
Using the Customizing Tool Main Window
Understanding the app-custom Files
How to Start the Customizing Tool