EDIT202 – Web Page Lab
File Compression Using WinZip
·
The
purpose of the following mini-tutorial is to provide instruction on the purpose
and procedures for file compression directly as they relate to the EDIT 202
course.
·
The
program you will be using to compressed is called WinZip. The latest version of
the program has been installed on your computer in the lab, but if you wish to
install it on your own machine at home you can do so by going to the following
website, http://www.winzip.com, and
downloading a free copy of the program.
·
The
reasons why you are being asked to compress your folder for submission are
twofold.
o
The
first reason is to save space. Once a
file has been compressed it will be smaller in file size. This reduction in file size does not mean
that you have lost data, compressing a file or a folder simply shrinks the
overall space needed to store a file.
o
The
second reason for compressing a file is packaging. When sending and receiving files (uploading
and downloading respectively) using WebCT you can only send or receive single
files and not an entire folder.
Compressing a folder packages the contents of that folder into a single
file with a “.zip” extension.
·
To
compress your folder right-click on your chosen folder and select the following
options.

- After you compress your folder
you will the following single file appear.
Notice the icon look similar to a folder being compressed by a
vice, hence file compression.

·
Once
a file has been zipped the only way to uncompress it is by using the WinZip program. You can only use WinZip, and no other programs to process “zip” files. Also to open these files up you cannot just
double-click on them, the instruction for opening “zip” files can be found
later on in this document.
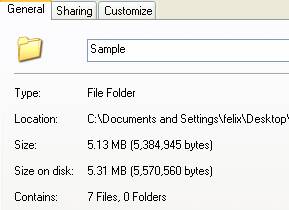
- Remember compression reduces
file size and packages, see below for screen shots to make note of the
size of folder before compression, and the size of your compressed file
after compression.
|
|
|
|
Uncompressed Folder |
Compressed File |

- Once your file has been
compressed and is in “.zip” format.
The person you are sending it to will have to have to be able to uncompress the file so they can
get to the files in the original folder.
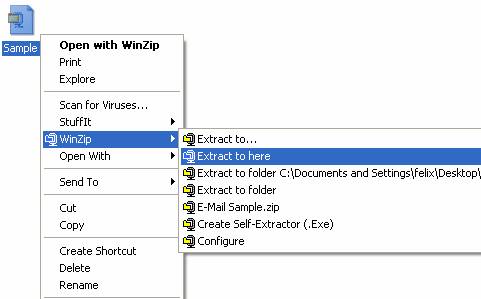
·
To
uncompress (sometime called unzipping)
right-click on your “zip” file and select the following options:
·
Once
this has been done you should see the original folder as it was before it was
compressed. Please note here that in
order to get access to a “.zip” file
you cannot just double-click to open it, the file must be uncompressed as shown
above.
![]()