EDIT202 – PowerPoint
Lab
Assignment Guidelines
|
1.
Create a folder
named “LABSEC-CCID-PowerPoint”. A
reminder to create your folder in a safe location. |
|
2.
Download the PowerPoint-Sample.mp4
video file from the course Moodle site and save it into your newly
created PowerPoint folder. |
|
3. Create a five slide PowerPoint presentation
adding the following guidelines for each slide: Slide 1 4a. Apply a
design template to your presentation file and save it as “EDIT 202-Powerpoint.pptx”. 4b. Leave
the text on this slide formatted as is.
Remember, the design theme you have chosen will have its own font,
text style, and color applied to the text on your slides. |
·
Launch Microsoft Powerpoint.
o Note the options for
launching or starting PowerPoint will be different depending on where you are
completing the lab. If all else
fails look for the PowerPoint Icon in
the Dock (MAC) or in the Applications folder (Windows).
·
Once you have launched Microsoft
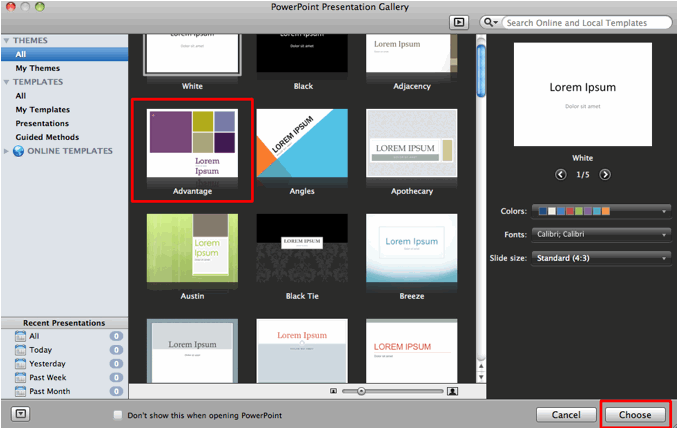
PowerPoint you should see the following PowerPoint Presentation Gallery window as shown below:
·
At this point before you create a blank presentation file you can apply
a design theme that will be applied to every new slide you create in your
presentation. If you like Choose the White theme and you can apply a different theme at a later
time. Once you have chosen a design
theme, Advantage as shown above,
click on the Choose button.
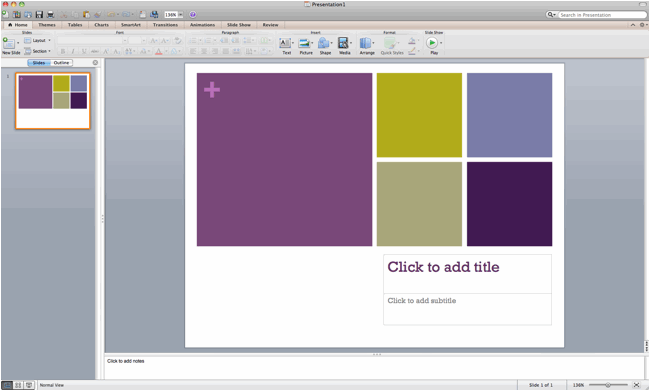
·
Once you have chosen a theme you should now view the PowerPoint
application interface with the file name “Presentation1”. Note that your interface may appear
different based on your choice of theme.
Also note that your design theme will affect the background, text, and
placement of slide objects for all future slides added to your presentation.
 a
a
·
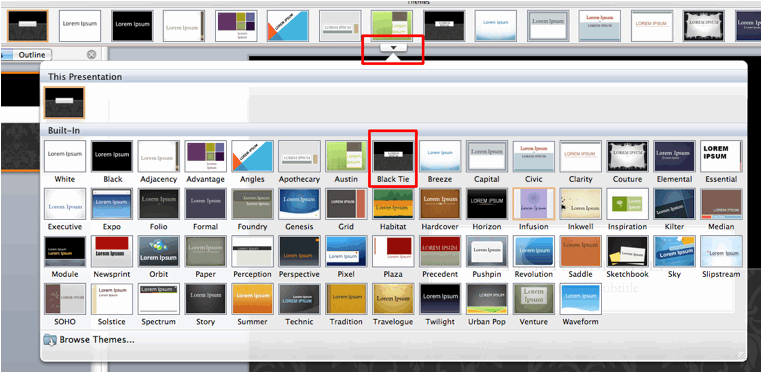
If you choose to apply a different design theme single click to the
select the Themes, tab from the
program interface:

·
Once the Theme options are
available single-click on the drop-down
tab and view all of the available design themes that are available (you can
even download some from the Internet), to select one (Black Tie) as shown below single click to apply the theme.
|
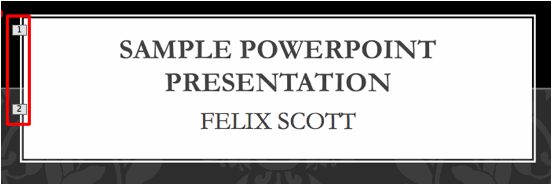
4c. Apply the Title Slide layout and type in the
following information for the title and sub-title: Sample
Presentation For EDIT 202 Created By: Your name here |
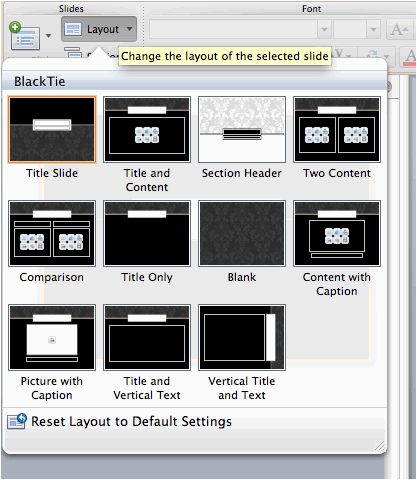
·
Note here that if this a newly created presentation then the Title Slide layout would already be
applied. However the steps outlined
below can be applied to future slides in this tutorial.
·
If the Title Slide layout
has not already been applied by default then to apply a new pre-formatted slide
layout first click on the select the Home
tab.
·
Once on the Home tab single
click the Layout drop-down menu to
apply a slide layout and choose the Title
Slide layout..
|
4d. Apply your choice of
animation to your Title Slide. |
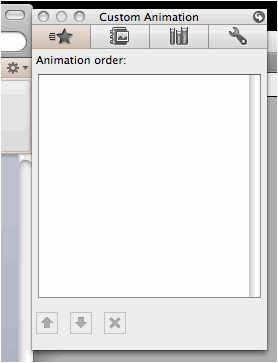
· To apply an animation sequence to your title slide first single click to select the Animations tab.
![]()
·
With the Animations tab open first single click
on the slide object you wish to animate.
You will know it is selected based on the dotted line that surrounds the
object.

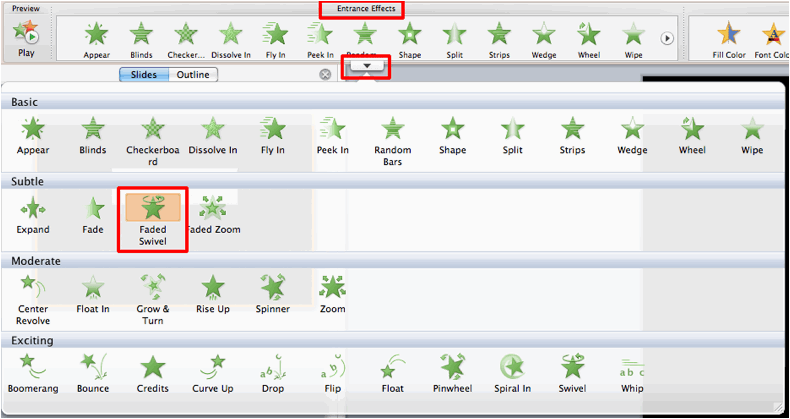
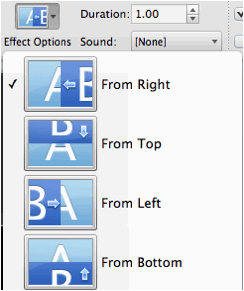
· With the object on your slide selected single click to select the available drop-down menu and single click to select your animation. To preview and apply the effect single click on the chose affect (Faded Swivel) as shown below. Keep previewing and selecting until you find one you like.
Please
note here that we are choosing from the Entrance
effects category. The other
categories Emphasis and Exit will be applied in future
steps. In this case we want an Entrance effect because we want the
title to not be present when we first view the presentation.
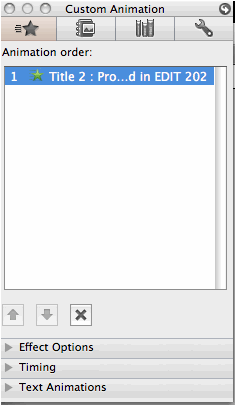
·
Once your effect
has been applied you will see a number appear on the slide to indicate the
animation order.

·
Be sure to
animate all slide objects on your
title slide before moving on to the next step.
|
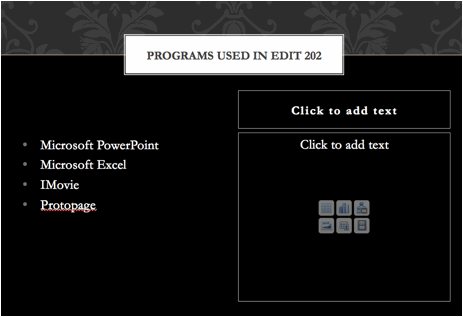
Slide 2 5a. Insert a new slide
with the Comparison layout and
type in the following information into your available text boxes. Do not add
the clip-art yet this step comes later on in the assignment. Please note your Comparison layout may appear different than the one shown below
based on your choice of theme.
|
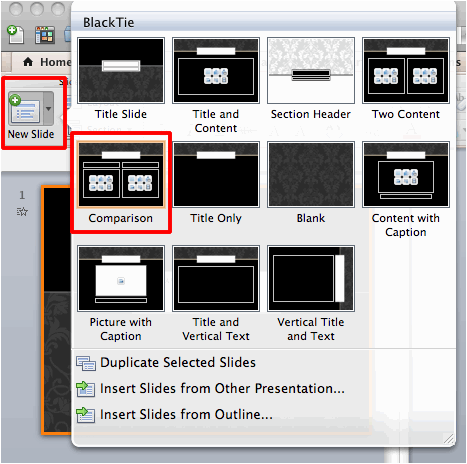
·
To add a new
slide first you have to be on the Home
tab. Once on the Home tab single click to select the New Slide drop-down menu and select the
Comparison layout.
·
Please note that
with PowerPoint you can always change your slide layout for an existing slide
by selecting the Layout drop-down
menu.
|
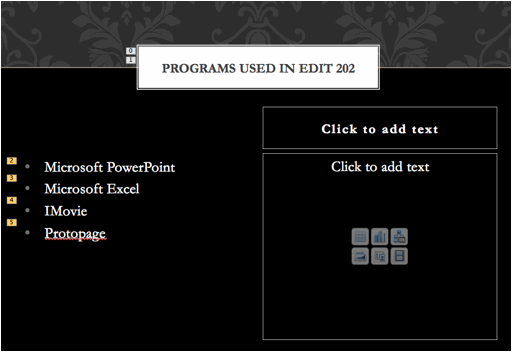
5b. Animate
the slide title “Programs used in EDIT
202”, using at least 2 custom
animation effects of your choice. ·
First apply an entrance effect, which makes the
slide title appear automatically when the slide is first viewed. ·
Apply a second
effect to your title that will occur after the mouse has been clicked. |
· To begin adding your custom
animation single click to select the Animations
tab and choose the Custom Animation button
to add the Custom Animation pane to your program interface.

Note:
Depending on your screen resolution you may have to hunt and search for the above-mentioned
Custom Animation pane.
· To add your first customized
animated effect single click to select the item on your slide, if the item you
are animating is a text box single click inside the text box to select it and
single click to selec your animated effect.

· Once your effect has been
added you can see in your Custom Animation
pane you will see that your animation has been added and it has been
labeled with a number 1. This indicates as it did on your Title Slide that the default animation
option of your animation appearing on a mouse click has been added. You need to
ensure that it appears automatically as the slide is shown.
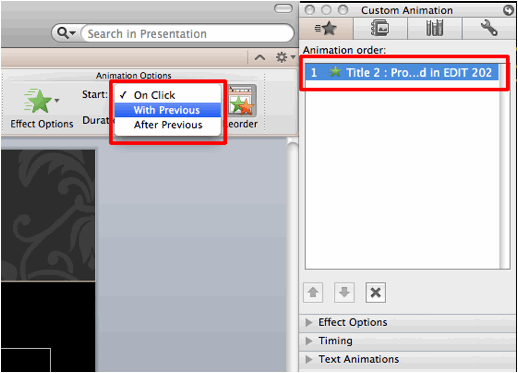
· To set your effect to be
viewed automatically as soon as the slide is shown, single click on the effect in
your Custom Animation pane so that
it is highlighted, and from the Start:
drop-down menu under Animation Options
select the With Previous
option.
· Once you have set your
animation to With Previous, this
means it will start with the previous event. In this case that previous event in the
appearance of the slide. Instead of
the number 1 next to your effect to
indicate the animation order, you should now see a number 0 indicating that this is now an automatic effect.
·
Now to add a second effect, be sure to single click to select your
slide object and add a second effect. Your second effect will be labeled with a
number 1 indicating that it will be animated on a mouse click.
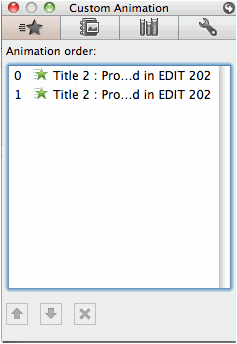
·
Notice the “0” and the “1”
for the animation order. The “0” indicates that the first effect one
your slide and will appear automatically when the slide is first viewed and the
“1” indicates that the second effect
will be viewed when you perform a mouse click as you are completing your
presentation.
|
5c. Animate the four points on this slide so that:
Choose
your own animated effect for the bulleted points along with your own choice
of color, and sound effect. |
·
To animate a bulleted text box click inside the text box and add your
chosen effect.
·
In the following example, our bulleted text box has been animated On Entrance,
with the Dissolve effect, and
has the timing option of On Click.
·
Notice that when we add an effect to our text box, each bulleted point
is treated as a separate slide object (e.g. 2, 3, 4 and 5). This means that you could have a separate effect and timing
option for each bulleted point. You
would simply have to modify the existing effect that you have just applied.
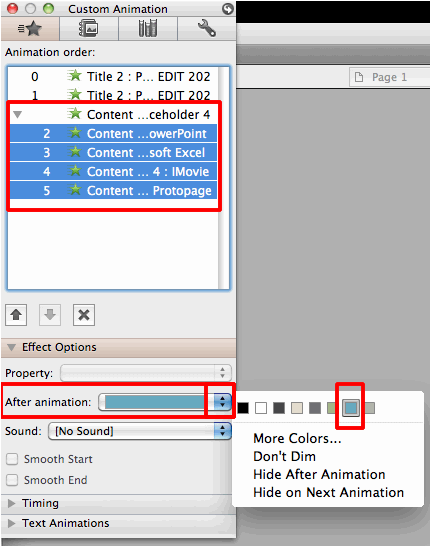
·
To apply the same dimming color to all your points single click to
select the Content Placeholder label
in your Custom Animation pane and
using the After Animation: drop-down menu under Effect Options choose a dimming color
as shown below:
·
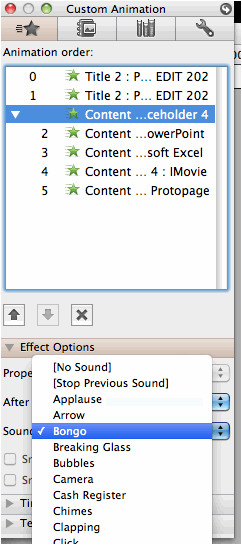
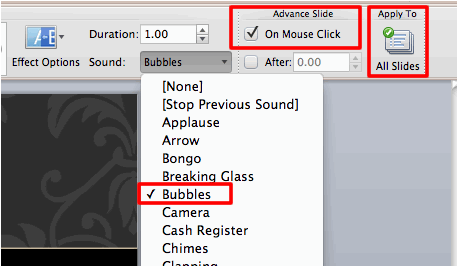
Using the same steps as shown above add your choice of sound effect for
bullets (please choose something
that will not overly irritate the marker).
·
Once you have selected a sound and a dimming color to apply these
changes to your effect move on the next step.
|
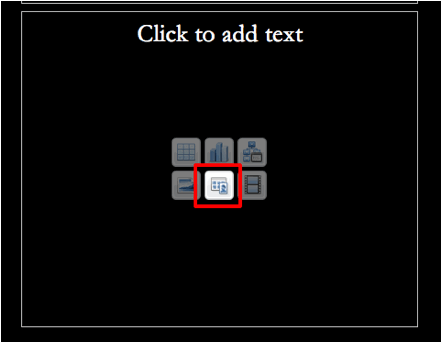
5d. Add a piece of clip-art to this slide. |
·
There are two ways to add clip art to a slide. One is adding it by using
a slide layout and one is by using the Insert
menu within PowerPoint (yes you can
use the menu options).
·
For the purpose of this assignment because you have already applied a
slide layout to your second slide you will be shown how to add clip-art using a
pre formatted layout.
·
To begin adding clip-art to a slide within a certain layout single click
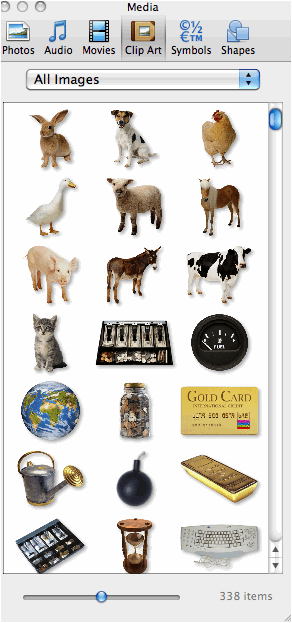
the clip-art browser button to bring up the Media pane.
·
This should bring up the Media
pane on the program interface as
shown below.
·
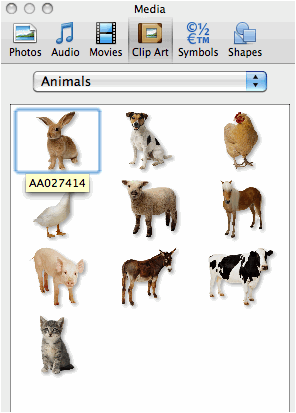
To search for specific piece of clip-art single click on the available
drop-down menu and select an available category and choose an image.
·
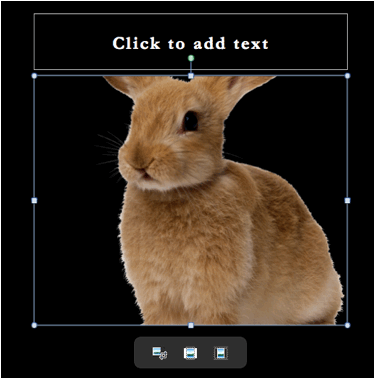
To add a piece of clip-art single click and drag the image to the
content box available on your slide.
·
You may notice that the image may not fit properly inside the available
content placeholder. To
automatically resize the image so that it does fit inside the placeholder click
on the available resize button right below the picture.

· Other resizing options include
free hand cropping or automatic cropping to conform or trim the picture to fit
inside the placeholder.

|
5g. Animate this clip art with your choice of entrance effect. Add a
sound to this entrance effect and have the clip-art be animated on a mouse
click. The clip-art should be the last object that is animated on this slide. |
|
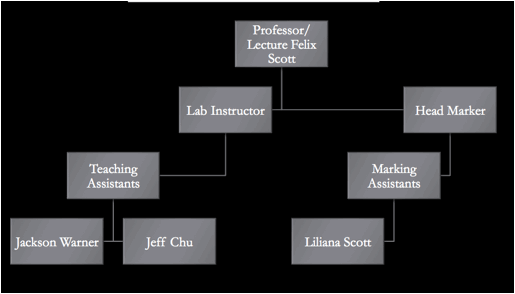
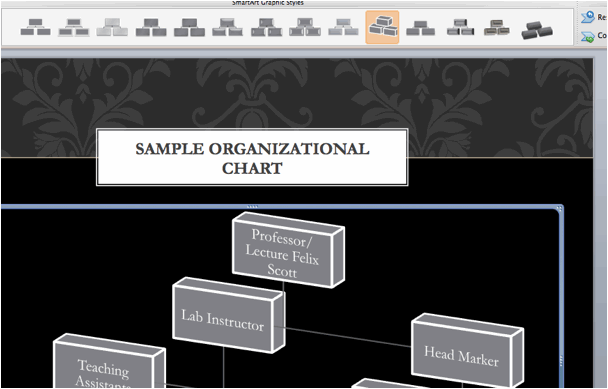
Slide 3 6a. Insert a new slide
with the Title and Content layout
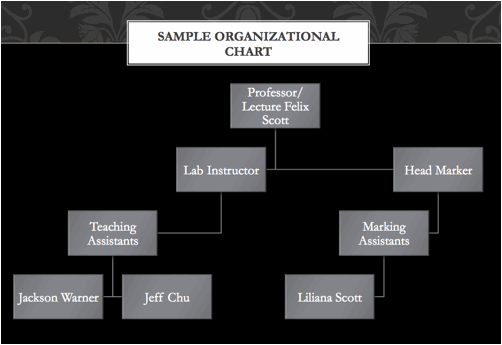
and in the title text box for this slide type in Sample Organizational Chart. Include the following data in your
chart. Note: The appearance of your chart will
depend on your choice of design theme and may appear different then the one
shown below.
|
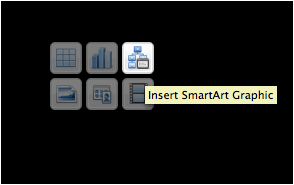
·
To begin adding an organizational chart to your slide single click to
select the Insert SmartArt Graphic
as shown below.
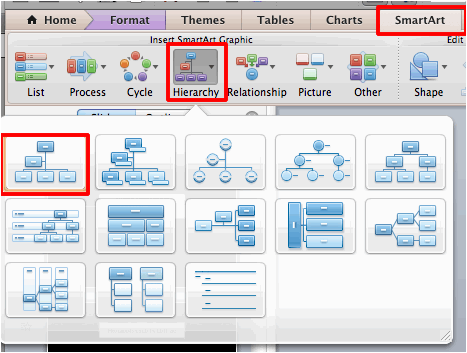
·
Once you click on the Insert
SmartArt Graphic button you should now see the following SmartArt tab appear above in your menu
options. From the available Hierarchy drop-down menu select the Organizational Chart option as shown
below:
·
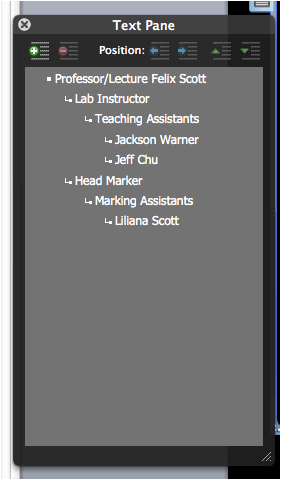
You should now be able to type in the following information in your
text layout box. Using
the Tab and Enter type in the following data. The changed you make in the Text Pane
will reflect changes in the appearance and layout of the chart on your
slide.
·
After you have finished typing in your chart data your slide should
appear similar to the one shown below:
· As an optional step you can apply a different style to your chart by applying a different style using the Smart Art Graphic Style menu. First single click to select our chart and then choose one of the available styles.
|
6b. Apply any Emphasis effect to your
organizational chart with Laser sound
effect. Animate the chart so that it appears on the slide automatically as
soon as the slide is viewed. |
·
To add the Emphasis effect
single click on the edge of your organizational chart and choose from the list
of Emphasis effects under the Animations tab.
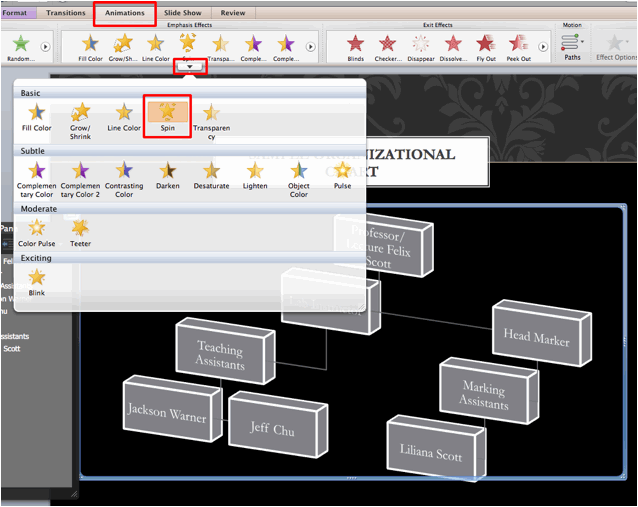
· Once the effect has been added to add the Laser sound effect visit the Effect options menu (for reference see step 5c).
|
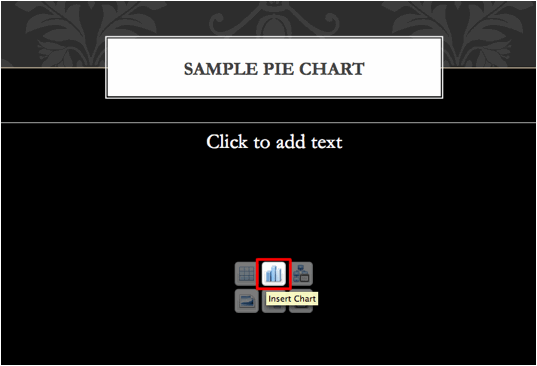
Slide 4 7a. Insert a new slide
with the Title and Content layout
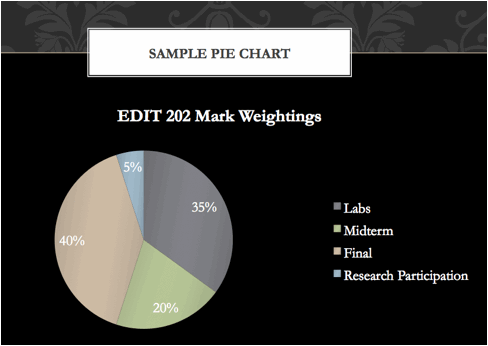
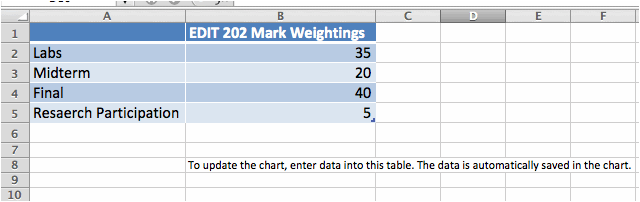
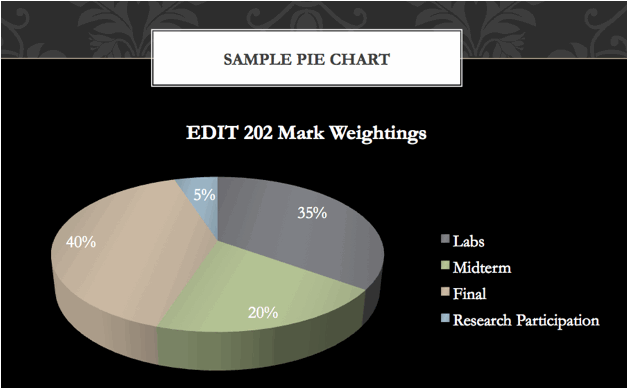
and in the title text box for this slide type in Sample Pie Chart. 7b. Add the following information to your
pie chart (including the chart title, data labels, and legend):
|
·
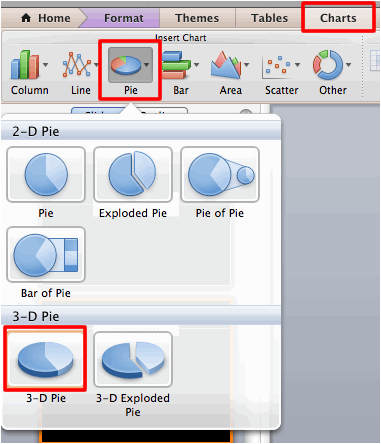
To create a Pie Chart on
your slide click on the Insert Chart button
as shown below.
·
After clicking on the Insert
Chart button the Charts tab
should now be visible as shown below.
From the Pie drop-down menu
single click to select your choice of pie chart (3-D Pie) as shown below.
·
As soon as you select your style of pie chart Microsoft Excel will open as shown below. By replacing the existing data with your
own data you will update the content of your chart back inside PowerPoint.
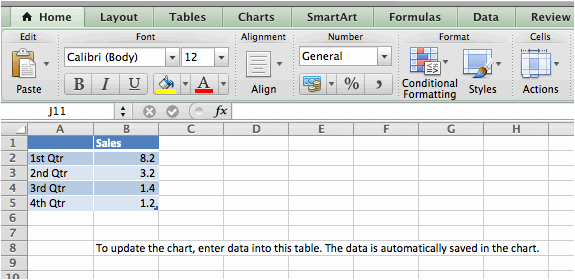
·
Type in the following data to update your chart back in PowerPoint. To type in the data simply click inside
the cells and start typing, please note in order to view all of your data you
may need to increase the column widths.
·
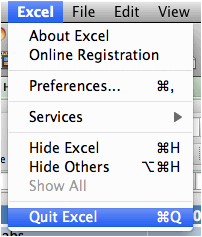
Once you have finished typing in your data, Quit the Excel application
and your new chart will appear on your slide.

·
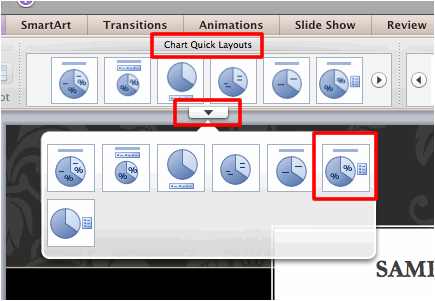
To add your data labels first single click to select your chart. Once you have selected your chart on
your slide you should now be able to see the Chart Quick Layouts menu at the top of your program window as shown
below. Single click to select a
layout that display the percentage values of your chart (Layout 6 as shown
below), and your chart should now appear on your slide with its proper data labels.
·
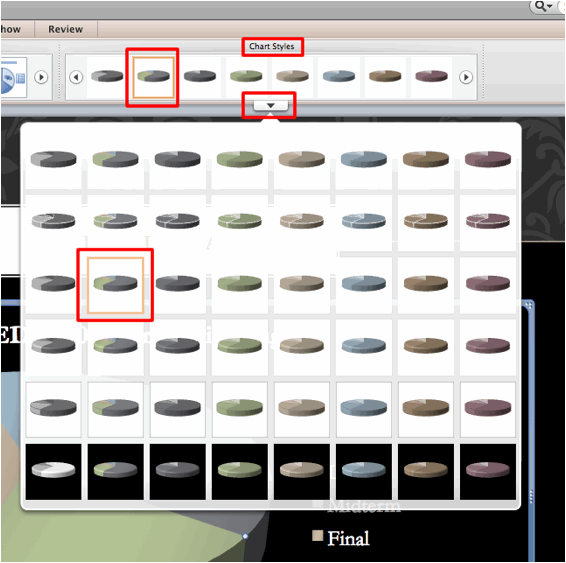
As an optional step to select a different style for your chart (which
would affect the colors and placement for your chart), single click to select
your chart and choose a different style from the available Chart Styles menu.
|
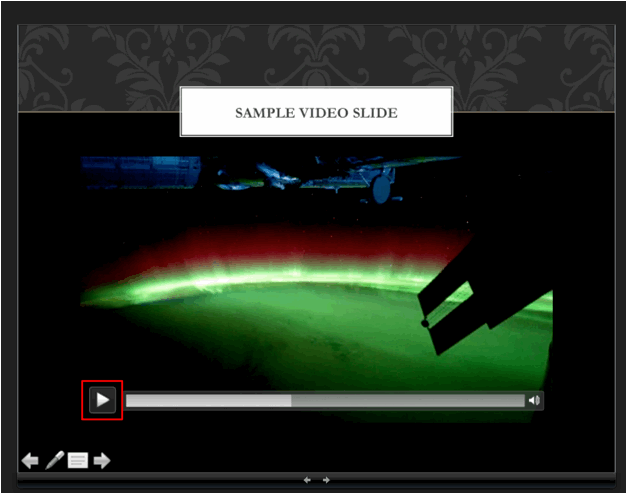
Slide 5 8a. Insert a new slide
with the Title and Content layout
and in the title text box for this slide type in Sample Video Slide. 8b. Insert the PowerPoint-Sample.mp4 file , which should be saved in your LABSEC-CCID-PowerPoint folder. |
·
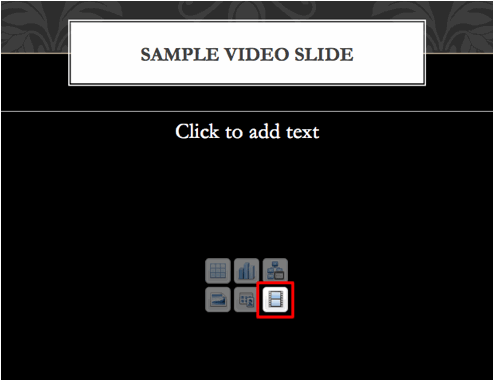
To add an audio or video file, single click on the Insert Movie From File button as shown below.
·
Locate the folder that contains the audio/video file you want to insert,
and then click on Insert.
·
The video file should now appear on your slide. By default the movie is set to play by
using the available media player options as shown below.
|
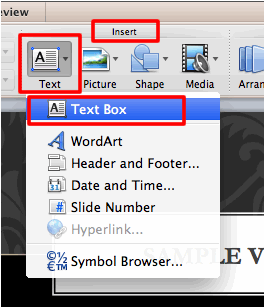
8d. Add a text box below
your movie. Include the following text, “Click on movie to play. Clip
courtesy of NASA”. |
· To add a text box first select the Home menu tab, and single click to
select Text Box button from the
Insert section of the toolbar.
·
To then create
the text box click below the video on your slide. Once the textbox has been created begin
typing.
|
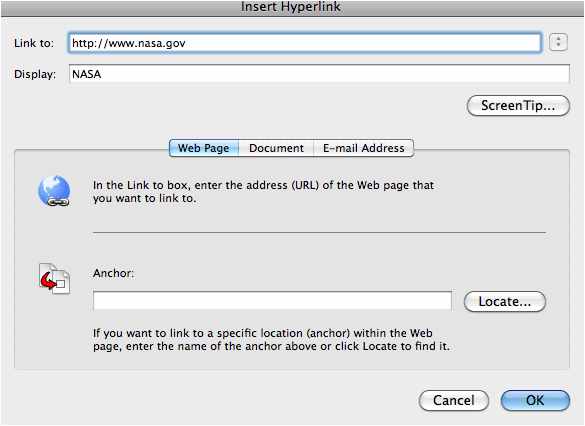
8e. Highlight the “NASA” text and insert a hyperlink to
the NASA homepage (“http://www.nasa.gov”). |
·
In PowerPoint any object on a slide can be used to create a
hyperlink. First highlight to
select your text and select Hyperlink
from the Insert menu (or Command + K on the keyboard).
· The Insert Hyperlink should then appear. Make sure to type in the
address correctly in the Link to: text
field, you can alter the text to display for your link in the Display: text field.
|
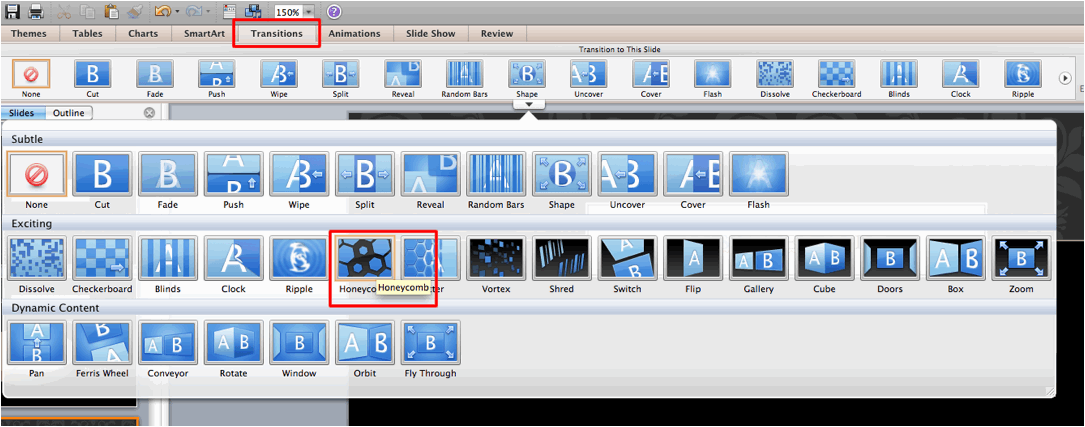
9. Add your choice of
slide transition to your presentation along with your choice of sound effect. |
·
To add a slide transition to your presentation select first select the Transitions menu tab and choose your
slide transition from the menu as shown below (Honeycomb in our example).
·
As an option you can adjust the given Effect Options as shown below (just to the right of your Transition selection).
·
Lastly to make sure that your transition has a sound effects select a
sound from the Sound: drop down
menu. Also single click to make sure the slide advances on a mouse click and that the transition is applied to all slides.
|
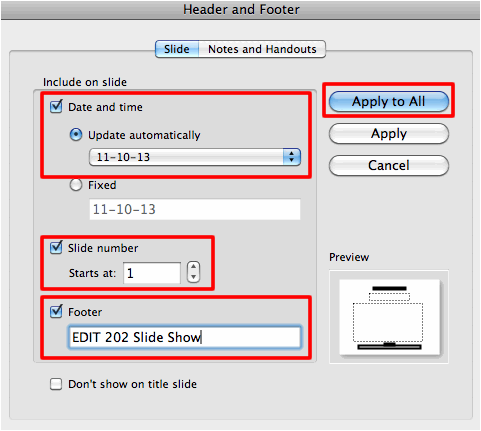
10. Add a
footer to each slide in your presentation that includes the Date and Time (updated automatically)
and Slide Number. |
·
To add a Header and Footer first select Header & Footer from the Insert
menu and the following Header and Footer
window should appear.
·
On the Slide tab, options
can be set that can change what will appear at the bottom of your slides:
o
Date and time can be set to Update automatically (to reflect the
last date the slides were modified) or Fixed
(type a certain date such as when the presentation will be given).
o
Selecting the Slide number
option will automatically insert a sequence number.
o
Selecting Footer (and typing
text in the box below it) inserts fixed footer text.
o
Selecting Don't show on title slide will omit the
footer from the title slide (but it will appear on the other slides).
o
Click on the Apply to All
button to make these changes throughout the presentation, but of course you can
click Apply to affect just the
current slide.
|
11. Preview
your slide show. |
·
To preview your slide show, select the Slide Show menu tab and click on the From Start button.

|
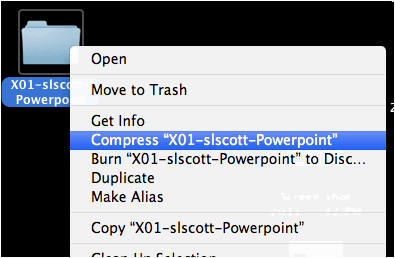
12. Compress your LABSEC-CCID-PowerPoint folder
and submit the resulting LABSEC-CCID-PowerPoint.zip file. |
· To compress your assignment folder, right click on the
folder icon and select the following option.
·
After the folder
has been compressed you should the following icon in the same location as your
folder. Submit this file to your
Moodle site as your PowerPoint assignment submission.
©Steven
Scott & The EDIT 202 Development Team
University
of Alberta